(Last update: 18 March 2025)
Beginning with MySword 3.0, a special Edition called the Deluxe Tablet/Complete Edition is given as a complimentary gift to generous donors and partners of MySword. The Deluxe Complete Edition is more optimized for Tablets but is not only limited to Honeycomb, ICS, Jellybean, Kit Kat, Lollipop, Marshmallow, Nougat and higher versions as it also supports Gingerbread tablets.
Please contact us if you want the Deluxe Complete Edition or upgrade your existing Premium Edition.
This article discusses the three major features and how to use them in detail - Main window Split screen / multiple views, Search Split screen, and Editor Split screen.
Main window Split screen / multiple views
With MySword Deluxe Complete Edition, it is now possible to have multiple views on the main screen so that you can have a Bible on the left, Strong's dictionary at the middle and a Commentary on the right. It is possible to have 2 to 4 columns, 2 to 3 rows, 2 rows with 2 columns or even 2 rows with 3 columns. Besides, each column of view can show any module type you select like Bible, Commentary, Dictionary, Journal/Book or Notes so it is also possible to have views showing different translations of the Bible.
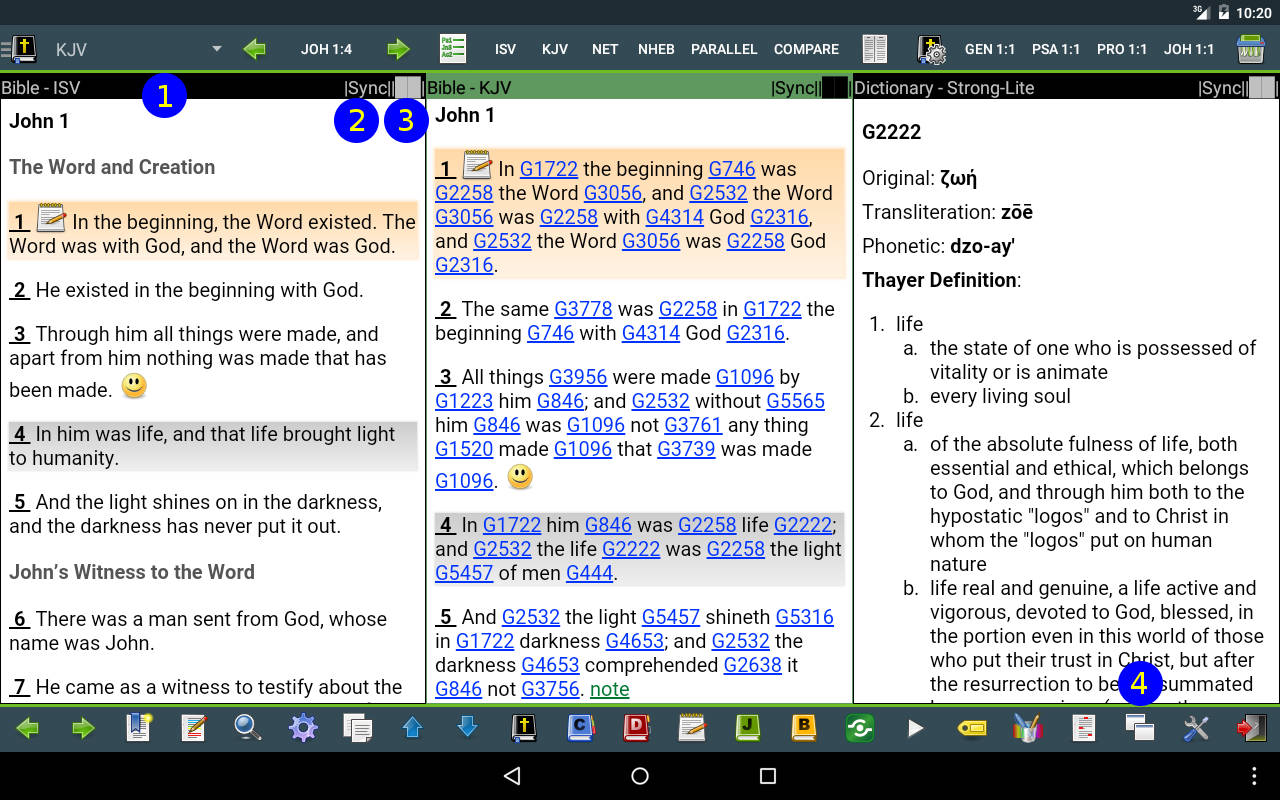
The screen shot below shows a split screen with 3 views showing Bible, Strong's Dictionary and Commentary with important parts numbered (used in the tutorial below).
- Switching to multiple screens/views
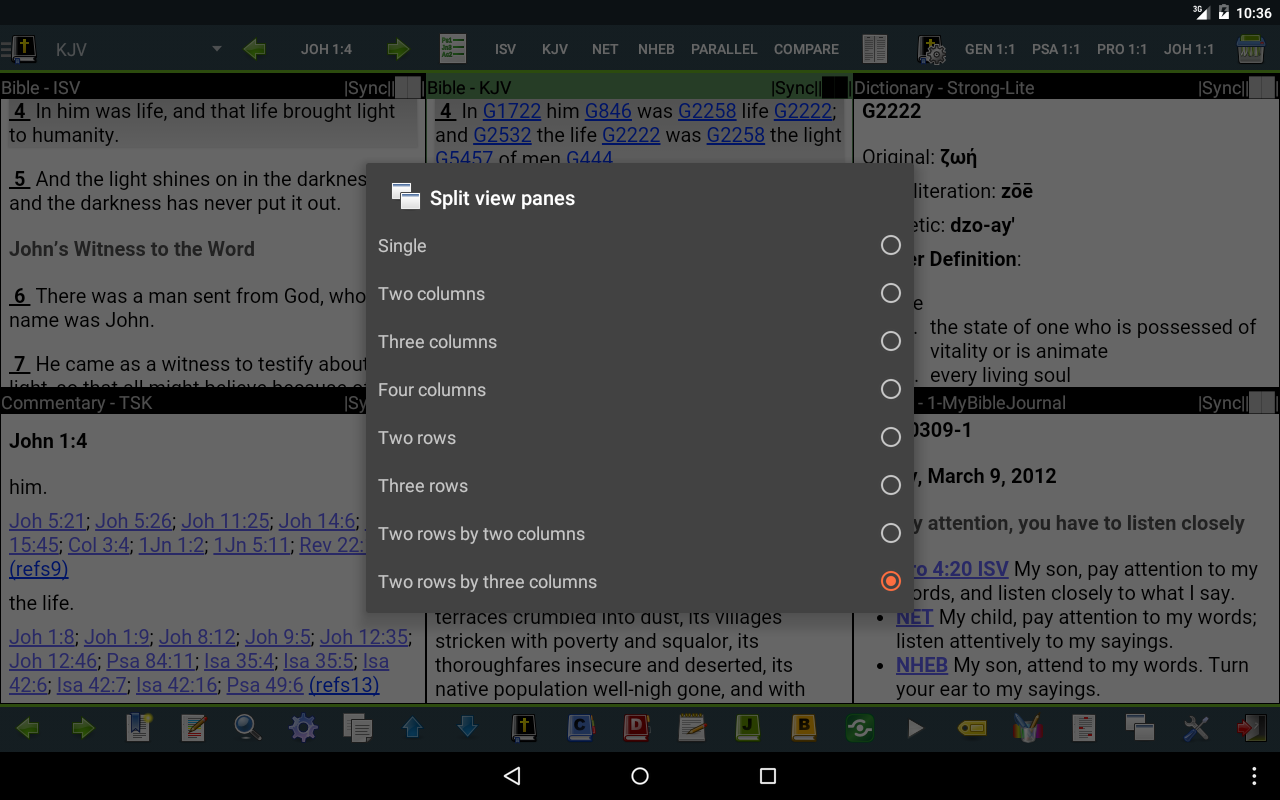
- Firstly, to switch to multiple screens/views, tap the Split screen button on the lower right (#4 in the screen shot). Try to select Three columns. This will restart MySword and will show 3 columns with Bible, Dictionary and Commentary by default the first time.
- Selecting an active view
- The button bar on the topmost shows the buttons for the active view. For example in the screen shot above, the active view is the center denoted by the green Label bar (#1 in the screen shot) and a thin border around the view so the top button bar shows Bible buttons as the active view is a Bible. If you tap a non-link area on the right view, the top button bar switches to Dictionary and the right view is now the new active view. Try it also on the left view. So the top button bar is actually view-context-sensitive.
- Sync mode
- By default all views are synchronized (Sync (#2 in the screen shot) on the top right of a split view). When you navigate to a Bible verse (for example via Bible verse selector, Previous/Next chapter buttons), all views that shows a Bible, Commentary or Notes will automatically go to that verse. The only exception is a Bible verse link tap in Commentary, Dictionary, Notes or Journals/Books which will only use one view.
- If you try to tap a Bible verse link on the Commentary on the right view, instead of that view changing to Bible, MySword will try to locate a Bible view nearest to the right wrapping to the left and will find that the left view is already in Bible view and in Sync so that will be chosen for the look up.
- Unsync mode
- Tapping the Sync (#2 in the screen shot) on the top label bar will switch that view to Unsync. This means this view will not receive navigational changes requested by other views (e.g. tapping a Bible verse link in a Commentary).
- Try to make the left Bible view Unsync. Then tap a Bible verse link on the right Commentary view. You will notice that the middle view (which is in Sync) will change to Bible view showing the verse tapped.
- Now press Back. Make also the middle view Unsync so that both the left and the middle are now in Unsync mode. Try to tap a Bible verse link on the Commentary view on the right and see what will happen. The right view is chosen to show the Bible verse because MySword found no other views are in Sync. What if I make the right view also Unsync? MySword will still use the right view in case no other views are in Sync as the Sync/Unsync is not used for the initiating view.
- To switch back to Sync mode, simply tap the Unsync.
- Temporarily maximizing a view
- Tap the Maximize/Restore (#3 in the screen shot) button located on the rightmost of the top label bar to temporarily maximize the view. Why temporary? Because a navigation causing a hidden view to be chosen to display content will automatically restore the views.
- If you are in Maximized mode, tapping the Maximize/Restore (#3) button again will switch back to normal view (restore all hidden views).
- Two Parallel Bibles using split screen
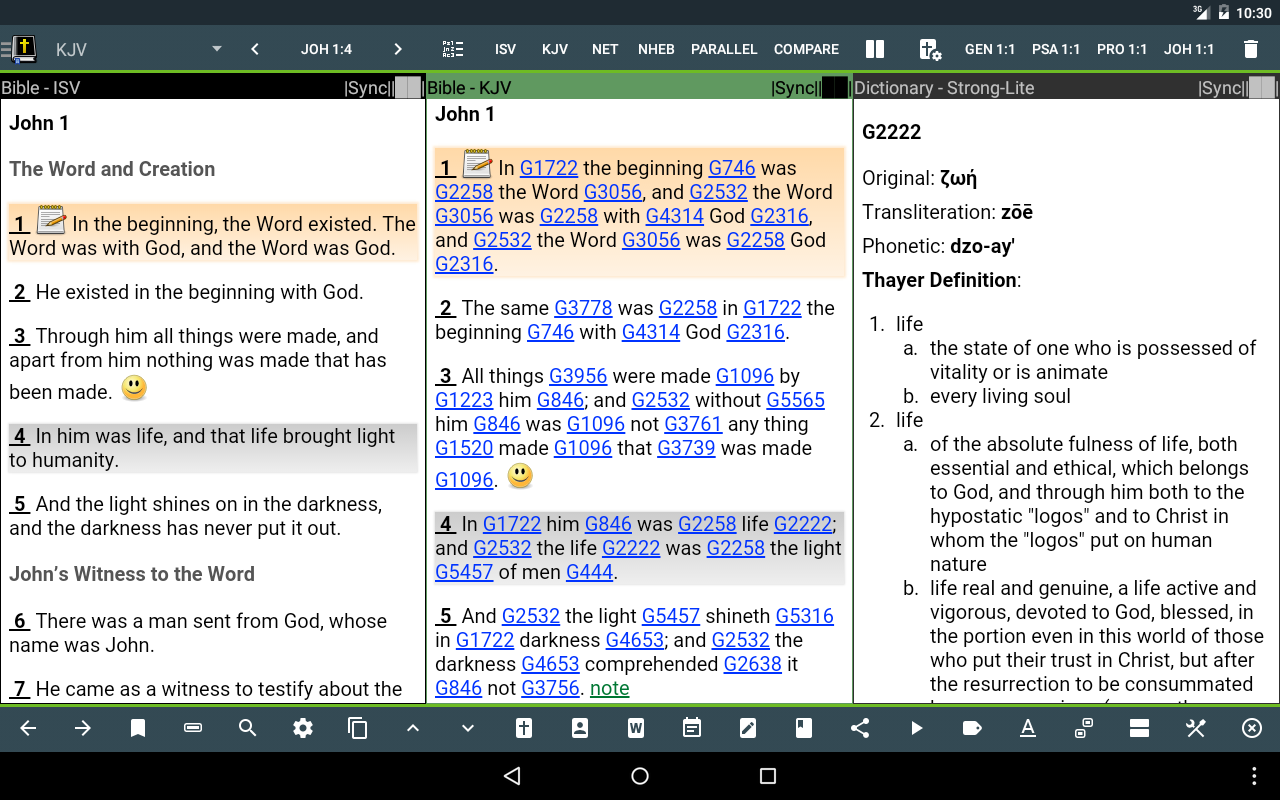
- It is possible to have two Bible views, just change the module type of the other view to Bible and select a different translation. But take note that this will not entirely replace the original Parallel View mode because scrolling a view will not automatically scroll another view in Split screen mode. However, you can manually sync two Bible views by tapping a verse on one view and the other view will automatically scroll to that verse (or no need to scroll in case the entire verse is already visible) unless the other Bible view is in Unsync mode. See the screenshot below.
- History navigation in Split screen mode
- All navigation movements that change the content of one view or the current verse in Bible view are stored in history. The only thing that is not saved is the selection of an active view as it does not change contents or current verse. Try to use the History Back button (MySword left button at the bottom or Android's Back button) to navigate back and the History Forward button to navigate forward.
- Switching back to Single view
- You can use the Split screen button on the lower right (#4 in the first screen shot) and choose Single.
Search Split screen
The Search screen will only be in split screen mode if it can accommodate the search details plus sufficient space on the right for the preview. So for 7 to 9 inch tablets with normal pixel densities, there will only be a split screen for the Landscape and not for the Portrait. But for the 10 inch tablets with normal pixel densities, the Portrait orientation is also included. Test it by going to Search and adjusting the orientation of your tablet.
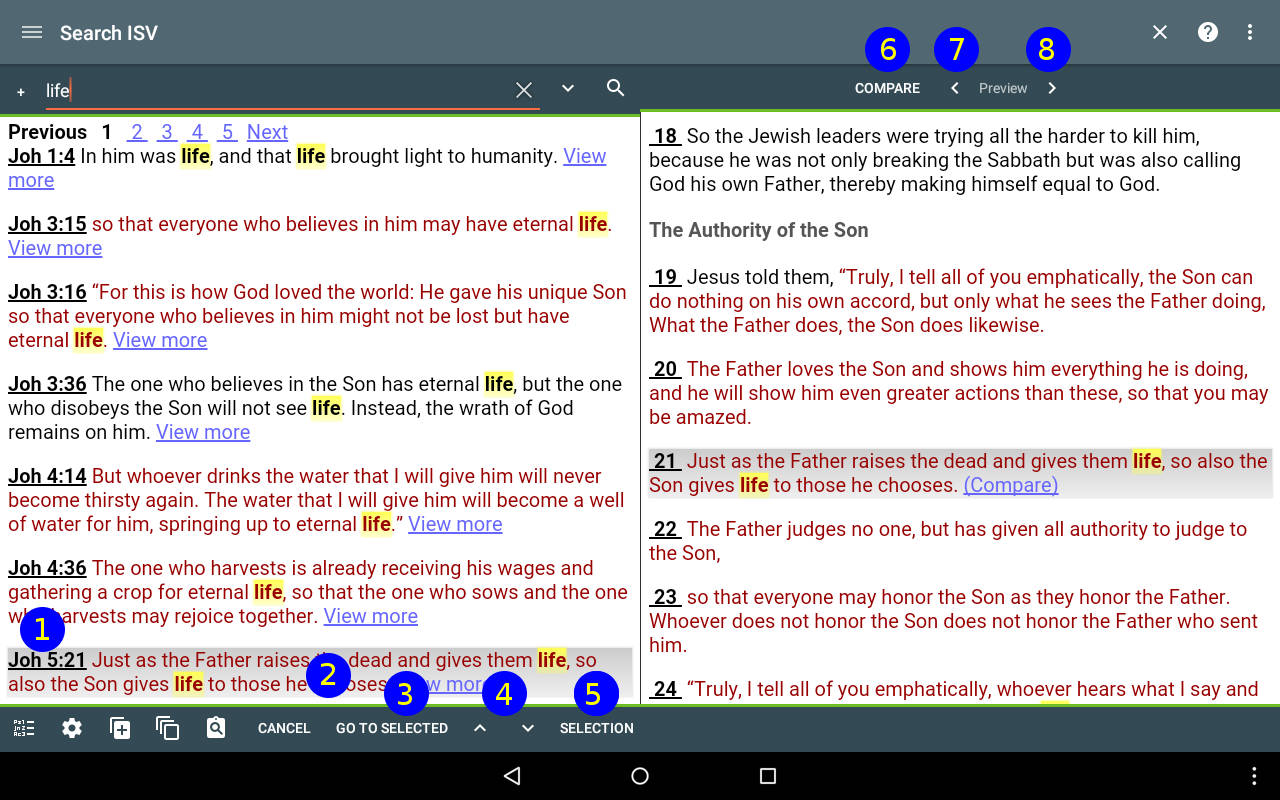
The screen shot below shows a Search split screen with important parts numbered.
- The left pane and the right
- The view on the left is the normal MySword search while the view on the right shows a Preview of the currently selected search result item. The advantage of having this preview is to see the entire context (whole chapter for the Bible or whole article for other module types) without tapping the verse link (#1 in the screen shot ) or View more for other modules.
- Previewing a result item
- When you perform a search, the first item in the result is automatically shown in the Preview on the right. Tapping the next item's content (e.g. #2 in the screen shot) other than the verse or title link (#1) will make it the currently selected result item and so show the preview on the right.
- You can also use the Left/Right (#7/#8) arrow buttons on top of the Preview to navigate to the previous/next result item.
- Also, you can swipe to right/left on the Preview to navigate.
- Selecting a result item for display on the Main screen
- Just like before, you can tap the verse or topic link (#1) to go to that verse or topic.
- Also, you can tap the Go to selected button (#3).
- Scrolling the result
- Just like in the old version of MySword, you can scroll the results list on the left using swipe up/down gestures or the Scroll Up/Down buttons (#4).
- To scroll the Preview content, only the swipe up/down gestures can be used though.
- Compare
- You can easily compare the different translations for the verse found by tapping the Compare button (#6).
- Selection
- The Selection button (#5) is used to specify a selection of modules to be searched all at once. The abbreviation of the module will be included in the output.
Editor Split screen
Would it be nice to type on the Editor box with a Bible view besides it? How about navigating this Bible view to the verse link that the cursor/caret in the editor is currently on? How about easily copying the currently selected verse in the Bible view into the Editor without leaving the editor? All these are made possible in MySword Deluxe Complete Edition!
Just like the Search in Split screen mode, there will only be a split screen in the Editor screen if the tablet size and orientation can accommodate it so try to go to the Editor and adjust the orientation of your tablet.
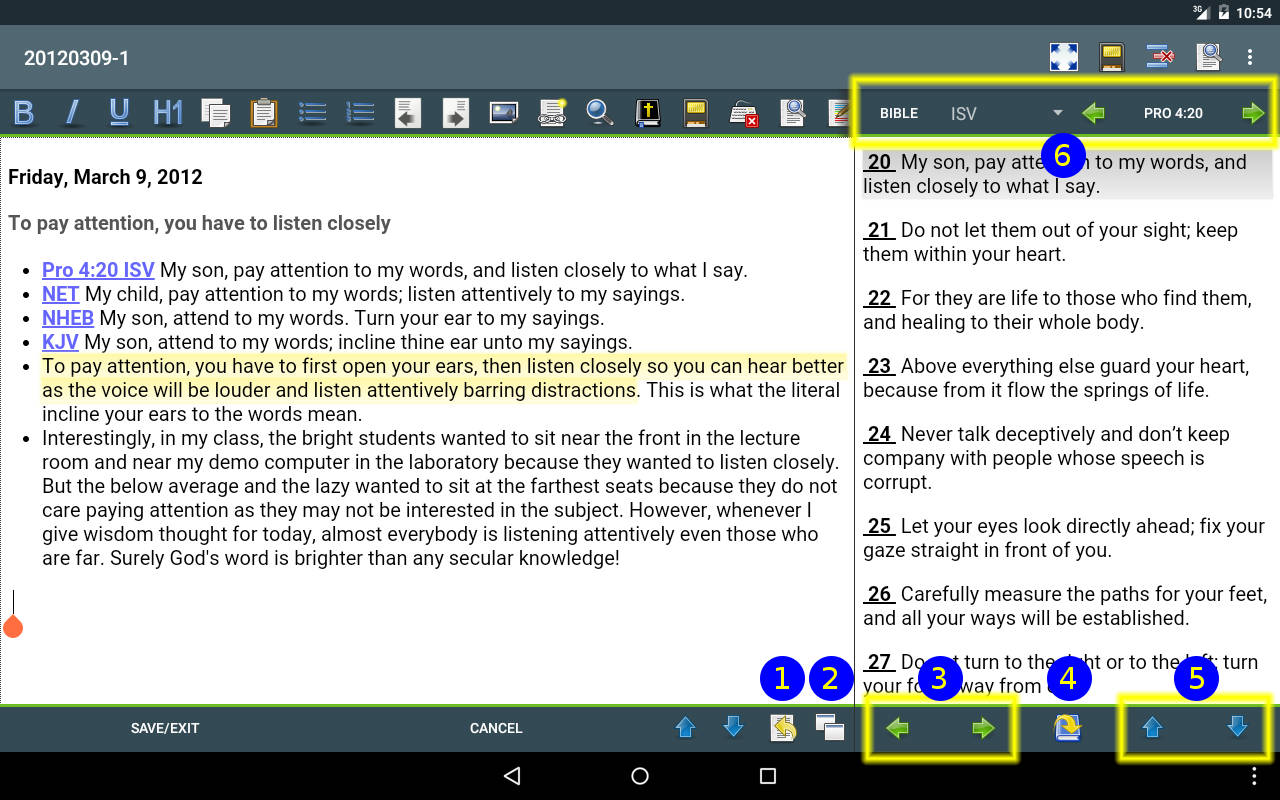
The screenshot below shows a split screen where the Editor and the Bible view is in 2:1 width ratio. The important parts are also numbered.
- Top and bottom buttons
- Note that the Editor pane on the left includes the top and bottom buttons and the Module viewer pane on the right includes its own top and bottom buttons. As you can see in the screenshot above, as there are more top buttons on the Editor pane and cannot fit, you have to use the swipe left/right gestures to scroll the buttons.
- The top buttons (#6 in the screen shot) of the Module viewer pane can also be scrolled in case they do not fit. The sample screen shot shows a Bible, but it can be changed using the Module type selector button (the leftmost) just like in the Main screen. Note however that the top and bottom buttons are limited to simple navigation stuff like History navigation buttons (#3) and scroll up/down (#5).
- Adjusting the Split proportion
- By default, the Editor on the left is twice in width compared to the Module viewer on the right (2:1 ratio). You can adjust this by tapping the Split screen button (#2) located on the bottom rightmost of the Editor pane. After tapping that button, you will notice that the proportion is now 1:1. Tapping it again hides the Module viewer pane (1:0 ratio). Then tapping it again shows the default proportion (2:1).
- Copying Bible verse text into the Editor
- To copy the currently selected Bible verse (Prov 4:20 in the above example), first position the cursor/caret in the desired location in the Editor box, then tap the Copy verse button (#1).
- To copy a different verse, click first the verse number on the left or use the Bible verse selector on the top. Then tap the Copy verse button (#1).
- To copy a range of verses (just like in the example above), use long tap instead to show the range selector. Then tap the ending verse number you want.
- Creating a link to Dictionary, Commentary, Notes, Journal/Book entry
- Note that for Bible view, verse contents are copied in the above procedure. Now what if you are in the other views like the Dictionary or Commentary? That Copy verse button (#1) becomes Copy link button because it does not make sense to copy the entire content.
- Copying text from the Module viewer content
- What if you really want to copy a portion of text in the Module viewer? That is still possible if you are using Honeycomb and up. Try to long tap a text to show the Text selection action bar, adjust the beginning and end, then tap Copy on the action bar. Then you can paste it into the Editor using the Paste button on the top.
- For Gingerbread, you can use a similar technique but less the Action bar.
- For lower versions of Android, you will have to use the Main screen and the Menu->Copy.
- Looking up the link in the Editor into the Module viewer
- Now what if you want to easily navigate to the verse link (or whatever module link) in the Editor and show that in the Module viewer? That is what the Jump to module link button (#4) is for. The cursor/caret does not have to be exactly inside the link (between [[ and ]] in case of Non-WYSIWYG). MySword will actually try to search the current line beginning with the current position of the caret to the left to locate a link. If a link is not found, nothing will happen.
- I found this very useful if the Pastor in the church dictates verses too fast so that it will be faster to type the links manually, put the [[ ]] later (in case of Non-WYSIWYG) or even better use Menu->Detect verses, then use this feature to navigate to each verse, instead of scrolling through the standard Verse Selector screen to enter the verse. And if you want to include the verse text, you can just use the Jump to module link (#4) then Copy verse (#1) replacing the old Bible link.
